Weber Kettle Recipe
Smoked Beef Ribs on a Weber Kettle: The Complete Dino Ribs Recipe
Smoked beef ribs are what happens when you take the absolute best qualities of brisket — deep beefy flavor, rich bark, tender marbled meat — and concentrate them onto a single bone. BBQ enthusiasts call them "brisket on a stick" for a reason. Cooked on a Weber kettle at 250°F for 5-6 hours with oak wood smoke, plate ribs (also called dino ribs or beef back short ribs) produce the kind of result that makes guests stop talking mid-bite. This recipe uses a Weber 22-inch kettle grill with a Slow 'N Sear setup — the approach the BBQ community has perfected over two decades. Works on any kettle-style charcoal grill.
Ready for the full 12–14 hour version? Our smoked brisket recipe walks through the pellet-grill method on a whole packer.
The Recipe
Smoked Beef Plate Ribs
Rated 4.9 — based on 98 reader ratings
Prep Time
15 minutes
Cook Time
5-6 hours
Rest Time
15-20 minutes
Serves
3-4 (one 3-bone rack)
Smoker temp: 250°F (low and slow)
Pull temp: 203-205°F internal (probe tender)
Recommended pellets: Oak (primary) or oak + hickory blend on Weber Kettle + Slow 'N Sear
Share this recipe:
The Cut Explained
What Are Beef Plate Ribs? (Dino Ribs, Bronto Ribs, Beef Back Short Ribs)
The BBQ world calls them by at least five different names. Here's what you're actually buying — and why this cut is worth the effort.
"Beef plate ribs" refers to a specific cut from the belly of the cow — the short ribs just below the ribeye section. What makes them special is the combination of heavy marbling (like ribeye), significant bone mass (like brisket), and a thick meaty layer sitting on top of each bone. The result when smoked: concentrated beef flavor with rich rendered fat and fork-tender texture that feels like brisket in every bite.
Names you'll see on menus and butcher counters
- Plate ribs (most common butcher term)
- Dino ribs (BBQ community slang for their size)
- Bronto ribs (same, even bigger slang)
- Beef back short ribs (official industry name)
- 123A beef ribs (IMPS cut specification)
What to look for when shopping
- 3-4 bone plate ribs: ideal for a Weber Kettle, 4-5 pound slab
- Thick meat on top: minimum 1 inch of meat between bones and fat cap
- Heavy marbling: visible white streaks through the red meat
- No trimmed fat cap: leave the full 1/4 inch of fat for flavor
- Refrigerator-fresh, not previously frozen if possible
Where to buy: most grocery stores don't stock plate ribs in the case — ask the butcher for "beef plate ribs" or "beef back short ribs" from the back. Costco occasionally stocks them seasonally. Better butcher shops (Whole Foods, Harmon's, local butchers) carry them reliably. Online: Porter Road, Snake River Farms, and Crowd Cow sell premium grades. Budget: $8-15 per pound for USDA Choice, $15-25 per pound for USDA Prime. A 3-bone plate rib typically runs $35-60.
Don't confuse these with:
Flanken-style beef ribs are different — thin cross-cut ribs (1/4" thick slices across multiple bones) typically used for Korean galbi or quick-grilling. English-cut short ribs are single-bone pieces typically braised. Pork ribs (baby back or spare) are a completely different animal. This recipe is specifically for plate/dino ribs — thick-meat, bone-in, smoked low and slow.
Before You Start
What You'll Need
Beef ribs, simple seasoning, and a Weber kettle. This is a focused recipe — the beef flavor does most of the work.
The Ingredients
The SPG rub explained
"Salt, Pepper, Garlic" (SPG) is the Texas-style seasoning for beef. No sugar, no paprika, no complex rub — just three ingredients that let the beef's natural flavor dominate. Mix in a 2:1:0.5 ratio by volume (so for this recipe: 2 tbsp pepper, 1 tbsp salt, 0.5 tbsp granulated garlic). Make a larger batch if you cook beef often — it keeps indefinitely in an airtight jar.
The Equipment
The Slow 'N Sear is the single best kettle accessory for low-and-slow cooking. It creates a dedicated charcoal zone on one side plus a water reservoir for humidity. If you don't have one, the snake method (charcoal briquettes arranged in a C-shape around the kettle perimeter) works nearly as well.
Step by Step
How to Smoke Beef Plate Ribs on a Weber Kettle
Seven steps. The smoke does most of the work; you manage the temperature and wait for tenderness.
- 1
PREP
Trim fat cap, leave membrane, season with SPG
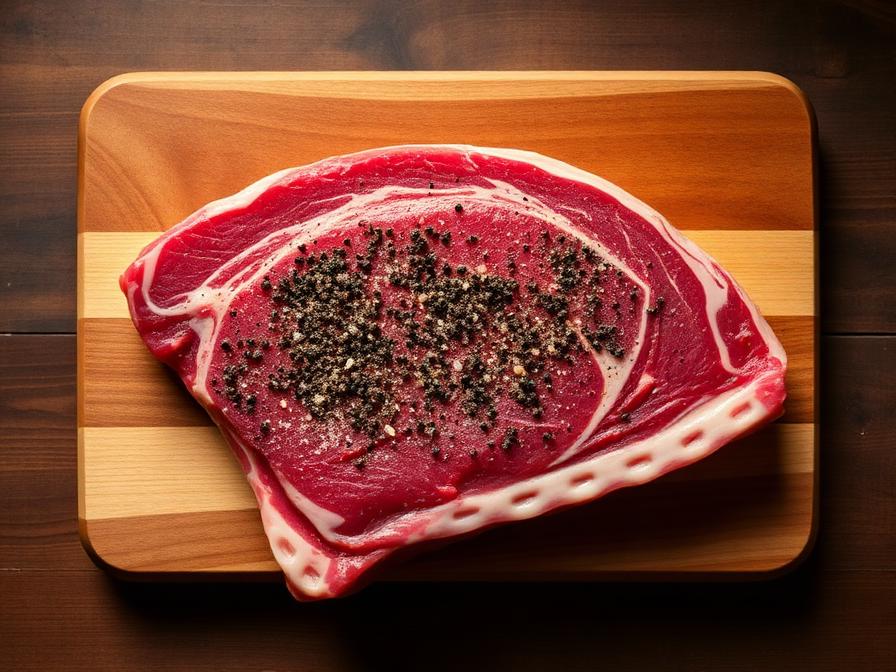
Start with a 3-4 bone rack of beef plate ribs (4-5 pounds total). Pat completely dry with paper towels. Trim the fat cap down to about 1/4 inch — thinner than raw-from-butcher but still substantial enough to render during the cook and keep the meat moist. Remove any visible silver skin from the meat side.
Critical: leave the membrane on the BONE side. Unlike pork ribs (where you always remove the membrane), beef rib membrane helps hold the meat onto the bones during the long cook. Removing it causes the meat to slide off prematurely and affects final presentation.
Mix the SPG rub: 2 parts coarse black pepper, 1 part kosher salt, 1/2 part granulated garlic. Apply Frank's Red Hot or a thin layer of Worcestershire as a binder (optional), then coat the ribs generously with SPG on top, sides, and bottom. Press the rub into the meat. Let rest at room temperature for 20-30 minutes while you prepare the grill.
For deeper flavor: season 8-24 hours in advance (dry brine), wrap in plastic, refrigerate until ready to cook.
Time: 15 minutes active + 30 minutes rest (or overnight dry brine)
- 2
SETUP
Configure the kettle for 2-zone cooking at 250°F
Load a full chimney of Weber briquettes (or lump charcoal) and light it. Let it burn 15-20 minutes until fully covered in gray ash.
While coals light, set up the Slow 'N Sear (or Char-Baskets) in the kettle. Fill the Slow 'N Sear's water reservoir with hot water (not cold — cold water drops kettle temp). If using Char-Baskets, place them on one side of the charcoal grate and leave the other side empty for indirect cooking.
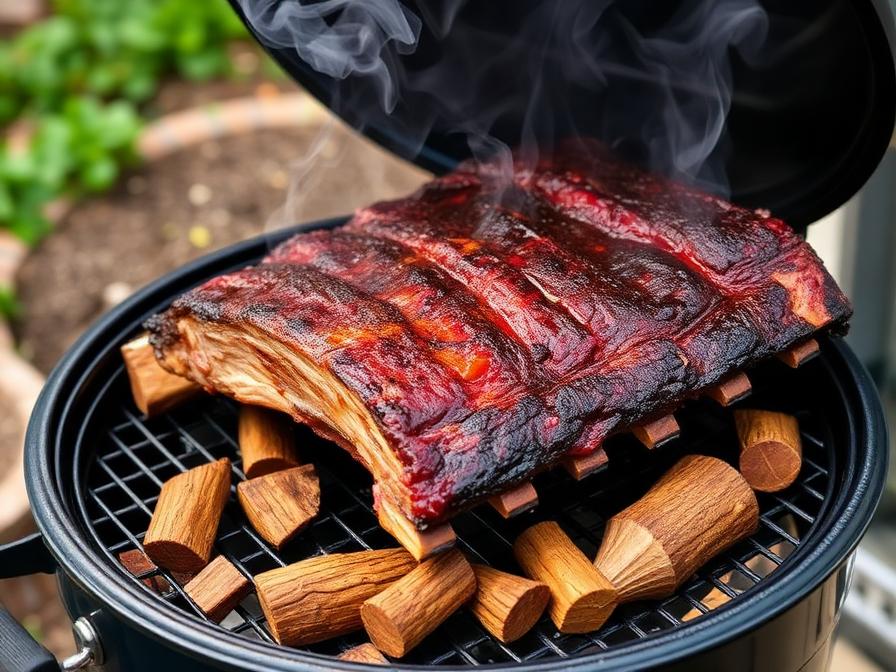
Pour the lit charcoal into the Slow 'N Sear or Char-Baskets. Add 3-4 chunks of oak wood directly on top of the hot coals. Close the lid, open the top vent fully, and open the bottom vent about 25% to start.
Target temperature: 250°F on the dome thermometer. Adjust the bottom vent up or down in small increments (1/8 inch at a time) to stabilize temperature. Give the grill 10-15 minutes between adjustments — don't over-correct.
Time: 30 minutes setup and temperature stabilization
- 3
PLACE
Ribs go on the INDIRECT side, bone-side down
Once the kettle is stable at 250°F, place the seasoned ribs on the indirect side of the grate (opposite the charcoal). Position bone-side down — the bones protect the meat from direct radiant heat.
Insert your probe thermometer into the thickest part of the rack, avoiding any bones (probes reading bone temperature lie). Close the lid. Position the top vent directly over the meat so smoke draws across the ribs.
Do NOT open the lid for the next 2 hours. Every lid-open drops kettle temperature 30-50°F and takes 10-15 minutes to recover.
Time: 2 hours first phase (no intervention)
- 4
SPRITZ
Check bark development and spritz if needed (hour 2-3)
After 2 hours, briefly lift the lid to check the ribs. They should have a deep brown bark forming with visible pepper specks. Internal temperature should be 130-150°F at this point.
If the bark looks good and the surface isn't too dry, spritz lightly with apple juice (one light pass). If the bark looks dry or pale, spritz more generously. Don't over-spritz — too much liquid washes off rub and slows bark formation.
Close the lid immediately. Continue cooking.
Time: 30 seconds to spritz, then 2 more hours cooking
- 5
REFUEL
Replenish coals and wood as needed (hour 3-4)
Around the 3-4 hour mark, the initial charcoal load begins to weaken. Dome temperature may drop from 250°F toward 230°F. Add 8-10 lit briquettes (prepared in a chimney or on a hot plate) to the existing coals. Add one more chunk of oak wood if you want additional smoke.
Internal rib temperature at this point should be around 150-170°F — the ribs are in "the stall" where evaporative cooling slows the internal temp rise. This is normal. Don't panic. Just keep cooking.
Time: 5 minutes to refuel, then 1-2 more hours cooking
- 6
PROBE
Test for tenderness at 195-205°F internal
Around the 4-5 hour mark, internal temperature should reach 195-200°F. Do not pull yet — temperature alone isn't enough for beef ribs.
The probe test is the real signal: insert your thermometer probe between the bones, perpendicular to the ribs, into the thickest part of the meat. When the ribs are done, the probe will slide in "like warm butter" — zero resistance. If you feel any resistance, they need more time.
If probe-tender, proceed to the rest. If not, continue cooking at 250°F and check every 20 minutes. Total cook time usually lands at 5-6 hours for a 3-bone rack.
Time: 20-60 minutes additional cooking if not yet tender
- 7
REST
Rest 15-20 minutes, slice between bones
When the probe slides in cleanly, remove the ribs from the kettle. Tent loosely with foil (don't seal tightly — this causes the bark to soften too much). Rest 15-20 minutes.
During the rest, internal juices redistribute through the meat. Don't skip this. Cutting into rested ribs produces substantially juicier results than cutting immediately.
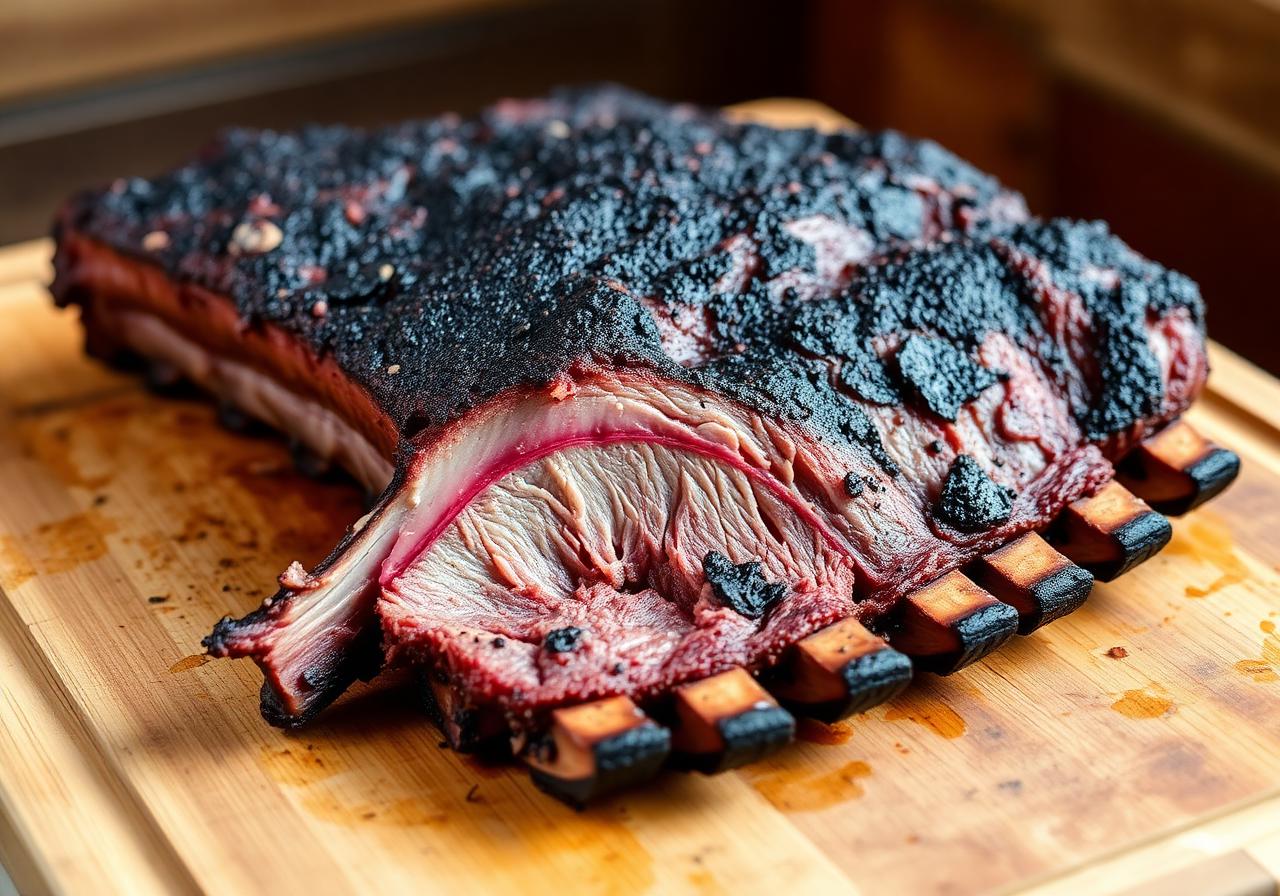
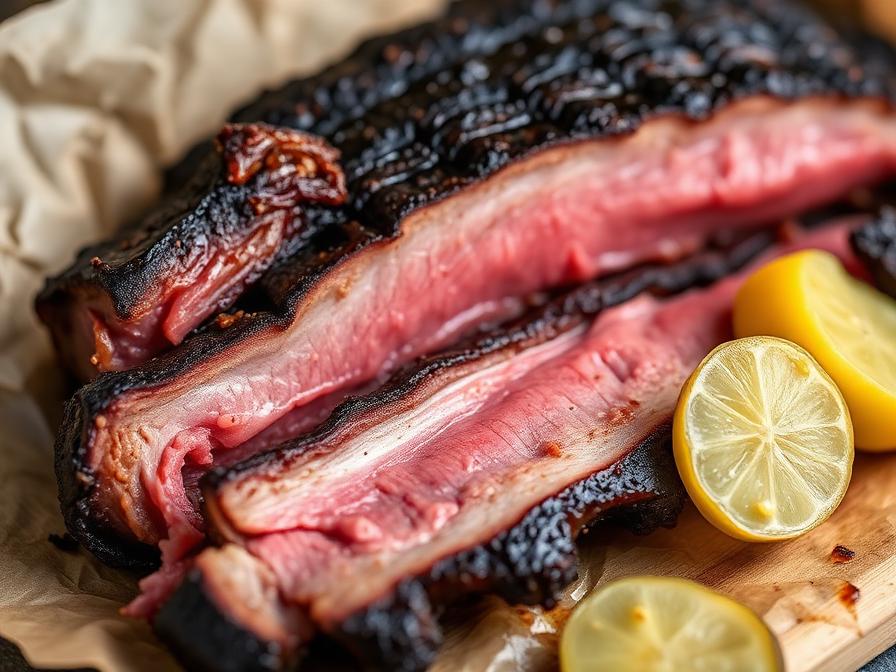
After resting, slice between each bone. Plate each bone as a single serving — these are massive, substantial portions. One bone per person is usually enough for most eaters; hungry guests may want 1.5 bones.
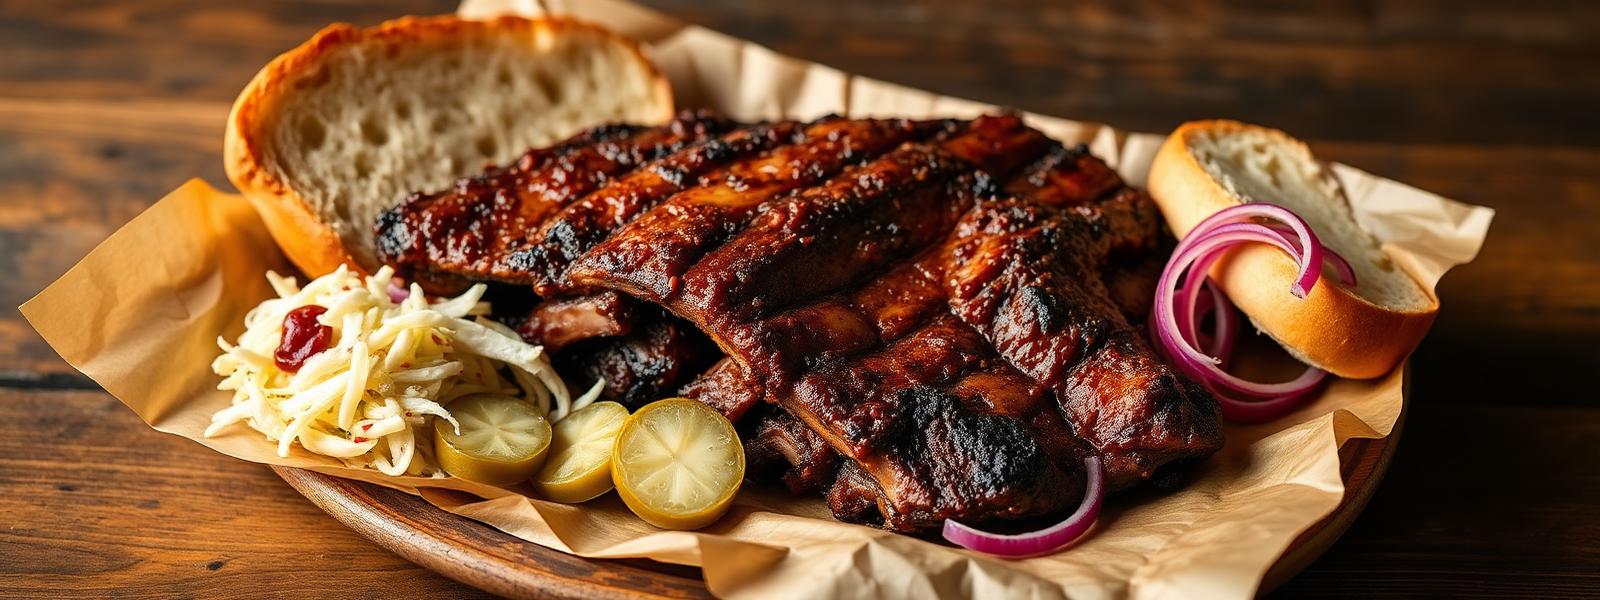
Serve immediately. Traditional sides: coleslaw, pickles, Texas toast, pickled red onions. No BBQ sauce needed — the bark is the flavor.
Time: 15-20 minutes rest + 5 minutes slicing
The BBQ Community Term
Why BBQ Enthusiasts Call Beef Ribs "Brisket on a Stick"
The nickname comes from the ideal result — and why this cut is worth the cook time.
Beef plate ribs share three characteristics with brisket that make them so sought-after in BBQ:
- Thick marbling throughout the meat. Like brisket point, plate ribs contain significant intramuscular fat that renders during long cooks. This fat is what creates the unctuous texture that makes people describe beef rib bites as "like butter."
- Long fibers that break down over hours. The muscle fibers in beef ribs are connected by collagen — the same tough connective tissue in brisket. Slow heat (250°F for 5-6 hours) breaks down collagen into gelatin, which is what creates the tender, juicy final texture. Cook too fast and the collagen stays tough; cook too long and it all renders out leaving dry meat.
- Bark potential. The thick meat on top of each bone creates a large surface area for Maillard browning and smoke penetration. A proper plate rib cook develops 1/4 inch of dark bark — the same kind that covers a perfectly smoked brisket.
The difference from brisket: plate ribs cook in 5-6 hours instead of 12-16. The bone mass speeds heat distribution and the smaller total mass finishes faster. For the same flavor profile as a whole brisket in half the time, plate ribs are the BBQ community's weekend shortcut.
Wood Selection
The Best Wood Chunks for Beef Ribs
Unlike pellet grills where pellet choice creates subtle flavor differences, wood chunks on a charcoal grill produce dramatically different results. Here's what works best for beef ribs.
Oak (The Texas Standard)
Central Texas BBQ's traditional wood for beef. Clean, balanced smoke that enhances beef's natural flavor without overwhelming it. Produces a beautiful mahogany bark. Most Texas pit masters smoke brisket exclusively with post oak. If you only buy one wood for beef ribs, buy oak.
Best for: Balanced smoke, traditional beef flavor, mahogany bark color
Hickory (Bold BBQ Flavor)
Stronger, slightly sweet smoke. Adds classic American BBQ character. Can be aggressive on a 5-6 hour cook — some cooks mix it 50/50 with oak for balance. Produces darker bark with more pronounced smoke flavor. Second-most-popular wood for beef after oak.
Best for: Bold BBQ flavor, dark bark, beef with a pronounced smoke note
Mesquite (Southwestern Intensity)
Very strong smoke — sharpest of the three options. Can overwhelm beef if used alone for a full 5-6 hour cook. Best used as one chunk mixed with 2-3 oak chunks, or for shorter cooks under 3 hours. Some BBQ traditions (Mexican, Southwestern) favor mesquite exclusively.
Best for: Strong smoke profile, blend with oak (not alone)
Recommended Combinations for Beef Ribs
- •100% oak (3-4 chunks) — traditional Texas style, beef-forward flavor
- •2 oak + 1 hickory — balanced BBQ with slight bold note
- •3 oak + 1 mesquite — subtle Southwestern character
- •2 oak + 1 cherry — mild with beautiful reddish bark color
Technique Debate
To Wrap or Not to Wrap Beef Ribs
Pork rib recipes universally wrap in foil during cooking. Beef ribs are different. Here's the honest answer.
The Texas BBQ tradition for beef ribs is no wrap — cook straight through from raw to done on the smoker, producing maximum bark and smoke flavor. This is the Franklin BBQ method, the Central Texas competition approach, and what most experienced pit masters prefer.
No-Wrap Method (Recommended)
Cook straight through at 250°F for 5-6 hours. Bark develops maximum depth and color. Smoke flavor penetrates fully. Final texture has a pronounced "bite-through" bark with tender interior. The traditional competition approach.
Best for: Maximum bark, traditional Texas-style results, competition-grade beef ribs.
Wrap in Butcher Paper (Alternative)
At the 4-hour mark (around 170°F internal), wrap in pink butcher/peach paper. Continue cooking until probe-tender. Paper breathes slightly, so bark stays somewhat intact. Speeds cook time by ~45 minutes and prevents over-drying.
Best for: Faster finish, slightly more forgiving method, beginners concerned about drying.
Do NOT wrap in foil for beef ribs. Foil creates steam that softens bark into mush — the opposite of what you want. Foil works for pork ribs (where softer bark is acceptable) but destroys what makes beef ribs exceptional. If you must wrap, use pink butcher paper only.
The Gear I Use
Essential Gear for Smoking Beef Ribs
Four tools that make this recipe reliably repeatable. The Slow 'N Sear is the single biggest upgrade.
Slow 'N Sear Insert
The single best Weber kettle accessory for low-and-slow cooking. Creates a dedicated charcoal zone, a water reservoir for humidity, and enables 8+ hour cooks without refueling. SNS Original fits 22-inch kettles ($120); SNS XL for 26-inch kettles ($150). Works on Weber, Napoleon, and most kettle-style grills.
Shop Slow 'N Sear →Leave-In Meat Thermometer
For 5-6 hour cooks, you need to monitor temperature without opening the lid repeatedly. ThermoPro TP20 at $70 — two wireless probes, reliable. ThermoWorks Smoke at $99 — premium accuracy, 4-probe upgrade available. MEATER Plus at $100 — single wireless probe that lives in the meat.
Shop leave-in thermometers →Oak Wood Chunks
Post oak is the Central Texas standard for beef. Lumberjack 100% Oak, Weber oak chunks, or local hardwood chunks from home improvement stores all work. Buy chunks (not chips) — chunks produce cleaner, longer smoke on charcoal. 5-pound bag lasts 10-12 beef rib cooks.
Shop oak wood chunks →Food-Grade Spray Bottle
For apple juice spritzing during the cook. Any clean spray bottle works — no need for BBQ-branded. Fill with apple juice at hour 2 for mild sweetness, or water + apple cider vinegar (2:1 ratio) for more acidic spritz.
Shop spray bottles →Avoid These
6 Common Beef Rib Mistakes on a Weber Kettle
Six errors that separate great beef ribs from disappointing ones.
Mistake 1: Buying the wrong cut
The biggest mistake is buying "beef ribs" that are actually flanken-style (thin cross-cut slices) or English-cut (single-bone pieces for braising). Those cuts cook completely differently. Always ask for "plate ribs," "dino ribs," or "beef back short ribs" with the thick meat cap on top and 3-4 connected bones. If the butcher shows you thin slices across multiple bones, that's flanken — wrong cut for this recipe.
Mistake 2: Removing the bone-side membrane
Unlike pork ribs (where you always remove the membrane), beef rib membrane stays on during the cook. The membrane holds the meat onto the bones during the 5-6 hour cook. Remove it and the meat can slide off prematurely, falling apart when you try to present the rack whole. Leave it on.
Mistake 3: Using sugary BBQ rub instead of SPG
Texas-style SPG (salt, pepper, garlic) is the correct rub for beef. Sugar-based BBQ rubs (Sweet Baby Ray's, Traeger Beef Rub, Kansas City style) can burn at sustained 250°F temperatures and produce bitter bark. Beef ribs don't need sweetness — the beef flavor IS the flavor. Stick with SPG.
Mistake 4: Opening the lid too often
Every lid-open drops kettle temperature 30-50°F and takes 10-15 minutes to recover. Opening the lid 4-5 times during a 5-hour cook adds roughly an hour to total cook time AND interrupts the smoke absorption. Trust the probe thermometer. Only open the lid at scheduled intervals (hour 2 spritz, hour 3-4 charcoal refuel, hour 4-5 tenderness check).
Mistake 5: Pulling based on internal temp alone
Beef ribs CAN reach 200°F internal while still being too tough. Temperature is necessary but not sufficient. The probe test matters more: the thermometer probe should slide in "like warm butter" with zero resistance. If you feel any resistance at 200°F internal, cook another 20-30 minutes. Test every 20 minutes after hitting 195°F.
Mistake 6: Wrapping in foil instead of butcher paper
Foil creates steam that softens the bark into mush. Beef rib bark is the defining feature — ruining it with foil wrapping is the single biggest bark-destroying mistake. If you need to speed up the cook or prevent over-drying, use pink butcher (peach) paper. Or don't wrap at all and just accept the 5-6 hour cook time.
What to Serve With Them
5 Ways to Serve Smoked Beef Ribs
Beef ribs are substantial enough to be the whole meal. The best sides are simple, bright, or starchy — nothing that competes with the beef flavor.
1. Texas Plate
White butcher paper, one bone per person, pickles, pickled onions, white bread, coleslaw on the side. The authentic approach.
2. Family Style
Full rack on a wooden cutting board, sliced between bones, placed in center of table. Family serves themselves.
3. Sandwich Style
Chop off-bone meat, pile on brioche bun with pickled onion, arugula, and horseradish cream.
4. Plate Dinner
One bone, creamed corn, mac and cheese, collard greens — classic Southern BBQ dinner.
5. Sides Rotation
Baked beans, potato salad, cornbread, grilled asparagus, Texas toast. Pick 2-3 classics.
Leftover beef ribs keep beautifully in the fridge for 3-4 days and freeze well for 3 months. Reheat wrapped in foil with a splash of beef broth in a 275°F oven for 25 minutes — better than microwave reheating, which dries the meat. Sliced leftover beef rib meat is excellent on salads, tacos, or pasta.
FAQ